Pages

Tuesday, June 30, 2015

3 Winners, 3 Way, 3 Day Giveaway!


Hi Friends!

It took me a year and a half, but I finally did it!  I posted my 100th product to my TeachersPayTeachers store!  That may not seem like such a big feat, but to me it was a milestone I was struggling to reach.

It took me about 2 months to complete this resource and it wasn't until school was out for the summer that I was able to put the time into it I really needed in order to give my buyers everything I think they needed to successfully teach students to compare and contrast folklore.


Okay... enough product pictures!  Let's talk GIVEAWAY!  To celebrate reaching this mini-milestone,  I'm giving away this resource to 3 lucky winners!  Not only will the winners get this unit (a $12 value), but I'm also giving them a resource of their choice from my Teachers Pay Teachers store (up to $5 value)!

Its easy to enter:

1.  July 1st - Comment on this blog post with the name of the product from my Teachers Pay Teachers store that you would like to win along with your e-mail address.   (Click HERE to browse my store.)

2.  July 2nd - Visit my Facebook page.  Like and tag another 4th or 5th grade teacher on the giveaway post for that day.  

3.  July 3rd - Visit me on Instagram (literacylovescompany) and like the giveaway post for July 3rd!  

Each day, entries will be closed at 5:00 PM PST and the winner will be announced by 6:00 PM.   Winners will be announced on that social media platform, so check back to see if you won!  (For blog entries I will also e-mail the winner.)

If you aren't really interested in giveaways, but love to SAVE MONEY you can get the above resource for 50% off until the end of the giveaway (July 3rd at 5:00)!  That is a savings of $6! Click the HERE button above to find the unit.

Thank you in advance for taking part in this giveaway!  Your participation makes these giveaways fun for me and hopefully fun for you.  :)

Don't forget...  come see me on Facebook tomorrow and be thinking of a friend you would like to tag!

Until then,

UPDATE...

Thank you for participating!  The winner of my high tech drawing  (I drew a name out of a paper bag) is.... 


If you would like another chance to win, visit my Giveaway post on Facebook tomorrow (July 2nd)!  Like the post and tag a friend!


Tuesday, June 23, 2015

TpT Seller Challenge Week #2 - Dare to Dream

This is week #2 of the TpT Seller Challenge hosted by Third in Hollywood, Teach Create Motivate, Sparkling in Second, and Peppy Zesty Teacherista!  The first week, Makeover Madness was very inspiring and got me thinking about how far I have come on this Teachers Pay Teachers journey!  I had fun making over one of my products and am motivated to keep updating!  

This week's Challenge is "Dare to Dream".  

When I first started my TpT store, I did so with the hope that I would make enough money to help me pay for a trip to Las Vegas to see my sisters.  That small goal was met and I had an amazing reunion with my two siblings! 

That was last year and since then my TpT store has been very blessed.  I'm a little afraid to dare to dream in case it jinxes me.  :)  But...  that is the challenge, so I am going to share with you some of the dreams I have for my store and my life.  

1.  TpT Goals 
My little store on TeachersPayTeachers has already surpassed all of my original hopes, but the wonderful thing about goals is that when you reach one, you set another!  
So, my new goals for TpT are to be in the top 10 sellers of my state (I'm at 11) and to get to 1,000 followers for my store.  Eventually, someday, I'd like to be in the top 100 sellers on TpT, but that is a very far-fetched dream. 

Another goal I have for my store is to start selling clip art.  I love to create clip art and have made items for my own products,  but have been reluctant to put it in my store.  Just yesterday, I put my first set up for sale.  
Check it out HERE!  
I'm pretty excited about it and have it on sale for 50% off for a limited time.  

2.  Home 
I started this blogpost thinking that I'd really like to be able to hire a person to do my yard maintenance and someone to clean my house, but who am I kidding?  In the end, I love doing that stuff!  But there are a lot of home improvements I'd like to make and my hope is that TpT will help me make them a reality.  Some dreams are a roof over our deck, new carpeting, and new furniture.  

3.  Fun
Have you ever been kayaking?  Flat water?  It is so peaceful and serene.  I have dreamed of owning my own kayaks for years and hopefully, by next summer, I'll be able to take more pictures like this one... only in a kayak of my own.    
Fun for me includes taking my husband on vacation.  I would love to see more of the world.  I haven't been many places and would love to go to travel to Europe, Hawaii, and Italy.  

4. Retirement
I still have a lot of years before I retire...  too many.  But when I do retire, I want to feel financially secure.  Also, I would love to be able to buy a house on the Oregon coast and an RV.  
We would spend summers next to the beautiful Pacific ocean and migrate south for the winter.    Dream big, right?  

The challenge this week was to "Dare to Dream", but dreams remain dreams unless you put in the work to make them a reality.  I've worked hard.  I've spent many a night and weekend working on my computer.  I've had to learn how to make resources to sell, thumbnails, previews, create a blog, brand, market...  the list goes on and on.  But I wouldn't change any of it.  
The thing is...  I love what I do.  I love making my ideas into something tangible that other teachers find useful.  I love when a teacher contacts me to let me know that I saved her/him time or something I created made learning fun for children.  The hard work is worth it when I've made a difference for someone else. 

Because of TpT, I feel valued and appreciated on a bigger scale than just in my classroom.  

In the end, isn't that all of our dream?  


Tuesday, June 16, 2015

Designing TpT Product Covers - Color


I have to admit, sometimes I'm a little color challenged.  When we painted our deck I chose the color "espresso".  My husband's office is painted "peanut butter" and I'm pretty sure there is some "toasted almond" somewhere in this house.  So...  as you can see, I pretty much choose colors based on my favorite foods.

So, when it comes to designing my product covers for Teachers Pay Teachers, I needed a little help.  Luckily, while browsing the TpT forum, I hit upon a thread that really changed the way I work with color.

With the help of design-seeds.com and Pinterest, my product covers have a lot more POP!


I'm currently participating in a 4 week TpT Seller Challenge put on by Third in Hollywood and a few of her friends.  Week #1's challenge was "Makeover Madness!"  I decided to do a "makeover" on one of my best selling products: 

I created this resource early in my experience as a TpT seller.  I wasn't yet wise to the wonderful world of fonts and my experience with borders was my own hand drawn ones that I scanned onto my computer.  Time for a MAKE-OVER!

This product is part of a bundle and each resource in the bundle had a different colored cover page.

Originally, I wanted to keep the colors the same so I went in search of pink "Design Seeds" on Pinterest.


If you haven't been introduced to Design Seeds yet, trust me...  you'll get lost in them.  There are so many choices.  I finally chose this one:


I love the colors here.  Vibrant and a bit earthy.  Nothing too wild, yet eye-catching!  

The next thing I did was copy the image and add it to the PowerPoint page where I was working on my cover. 
Now, when choosing colors for my background and fonts, I chose "more colors" and then used my dropper tool to pick up the colors from the Design Seed.  

You can find Non-Fiction Text Structure HERE at a discount through Saturday (6/20)!  Only $3.00!   

Here is my cover after the make-over!  I not only have coordinating colors, but I also added my new logo and a photograph from my classroom taken while my students were studying nonfiction texts.

Here is the BEFORE and AFTER!  What do you think?  I'm actually really happy with it and can't wait to update the other three products in the bundle!

I also update the fonts and borders throughout the resource:

BEFORE - hard to read 

AFTER - more clear and border is neater

BEFORE - black and white, same font issue

AFTER- I added copies of each of the posters with a color border option.  Some buyer like a little color.  I didn't want to add too much as I know that colored ink costs and arm and a leg! 
So, there you have it!  An easy way to coordinate colors on your TpT products and other designs!  I hope this little tidbit makes designing your covers a bit more fun and makes your life a a lot easier!

Until next time!
{Hey!  For more tips and ideas find me on Facebook , Instagram, and Pinterest!} 


Wednesday, June 3, 2015

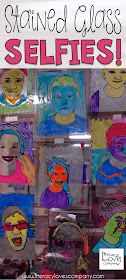
Stained Glass Selfies


Add some color and fun to your classroom with Stained Glass Selfies.  This blog post takes you step by step through the art project with full color photos.


Last week, I pulled out some pictures I had taken of my students toward the beginning of the school year and decided to use them for an art project to decorate our hall these last couple of weeks!

The project is actually quite easy if you have the materials.  For this project you will need:
1.  Transparency film.  My school actually had several boxes of these sheets gathering dust in a closet.  Now that many schools use document cameras, rather than overhead projectors, you might get lucky and find a box hiding away at your school!  You will need one sheet of film for each student.
 2.  Acrylic paint.  Nothing fancy, just several bright colors.
3.  Sharpie or other fine point permanent markers.  One for each student.  
4.  Plates to put paint on and Q-tips to use as paint brushes.
5.  Masking tape
6.  Photos of your students printed as full, 81/2 x 11, black and white sheets
7.  Plain white copy paper.  One for each student


Okay...  now that you have all of your materials, it is time for the fun to begin!  

It is always a great idea to try out the project yourself first.  This helps you plan your timing, work out any kinks, and it gives you a finish example to share with your students!  


I also always model for my students how to do the project.  for this project, first I showed students how to tape things down and trace their faces. 

PHASE 1
Step #1 - Hand out the photos to your students and after the giggling has subsided, have them tape them down to their desks or table.  Just a little tape on each corner will be fine.  This is just to keep the photo from shifting.  

Step #2 - Now, distribute the transparency sheets.  Students need to tape the transparency sheets over the top of their photographs.  I suggest just taping three of the corners, leaving one of the corners untaped.  This lets students slide the white copy paper between their photos and the transparency to check their tracing.  

Step #3 - Students are now ready to trace.  I always tell my students to look for and trace around the big shapes.  They shouldn't trace every hair and line.  They need empty spaces.  Anything that you want black, such as the pupils of the eyes, should be colored in with the Sharpie marker.  

PHASE 2

While students are tracing, I walk around and put blobs of paint on the plates at students' tables.  I usually put out two plates for a table of 4 with several choices of colors.  Along with the paints, give students several Q-Tips.  

Advice - I always tell my students to NOT mix the colors.  Only use the Q-tips for the colors they are for.  At the end of the project, when most students are done, I let students mix up the colors a bit for their backgrounds.  

Step #4 - without untaping the transparency film students begin using the Q-tips to paint in their shapes.  Students can use many different strokes:  dabs, swirls, contour lines, etc.  A suggestion is to use the darker colors first and let dry a bit before moving on.  The same for shapes that are directly next to each other; paint in one shape, let dry, then paint in the other shape.  If the paint is a bit dry, it is okay to go over the margins a bit.  This side of the painting is the backside.  When you turn the painting over, all of the marker lines will still show, so students shouldn't worry about covering the lines.  

Step #5 - Have the students add a background.  If you are going to let your students write something, remember that this is the backside of the painting and they will need to write anything in reverse for it to appear correct when displayed.


Step #7 - Let paintings dry.
Step #8 - Display the paintings in a window or on a white background for the colors to really POP!


My students really enjoyed this project!  Because of timing,  we only did the artwork, but I can see how this could lend itself to writing about themselves at the beginning of the year.  Another idea is to take the pictures on the first day of school and save them.  Bring them out at the end of the school year and have students write about how they have changed during the year.

Whether you plan on doing this project just for the sake of art or to integrate it into writing it will make a wonderful display and keepsake for your students!

I hope that this art idea is one you can add to your "toolbox".  If you have any questions or ideas for integrating this project into other areas of the curriculum, I'd love to hear from you!  Just leave your comment below in the comment section.

Thanks for visiting and I hope you will consider following me on Bloglovin, Facebook, and Instagram for more  art, lesson, and classroom idea posts!