Have you ever felt like time is getting away from you? That is how felt when I saw the date of my last blog post! I can't believe how long it has been since I've sat down to write! With school starting and a HUGE home project, I've struggled with fitting everything in. I'm happy to say that the home project is completed and I'm crossing my fingers that I can get back on a regular blogging schedule.
Do you ever find yourself in a student grouping rut? Well, I have some fun, easy to prep, grouping strategies that will make your students cheer!
There are times when, as teachers, we have to make careful, purposeful grouping decisions, BUT... there are other times when letting fate decide is the way to go!
Here are 5 cheer-worthy ways to randomly partner up or group your students:
1. Postcard Puzzle Pieces
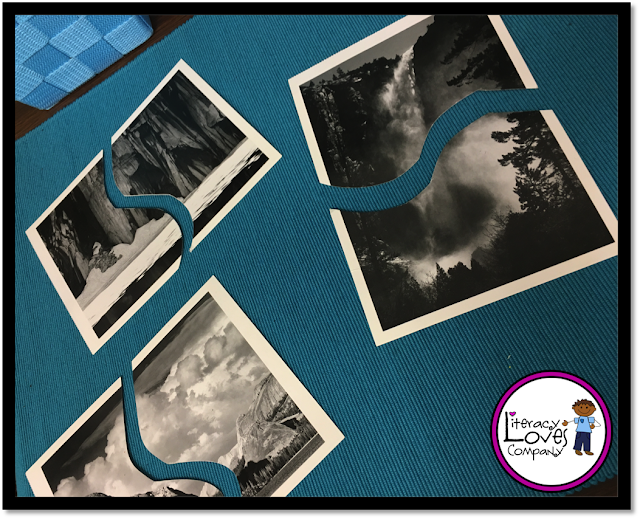
My students LOVE when I make groups using postcard puzzles! I pull out the envelop and they begin to wiggle with excitement. Making postcard grouping puzzles is easy. I have several sets of these puzzles. One for each number of students I want in a group. I have a set that makes groups of 3, one for groups of 4, and one for groups of 5, etc.
First, obviously, you'll need postcards! I have a set of postcards from around the state that I live, another a student brought me from her trip to Italy, and still another with artwork that I bought at the local art museum.
Second, figure out how many students you want in a group and how many postcards you will need. For example, if you have 24 students and you want groups of 4, you will need 6 postcards.
Third, cut each of the postcards up into however many students you want in each group. The pieces don't have to look like puzzle pieces, but I try to make them look interesting.
Most postcards already have a plastic coating, so this makes them more durable and you usually don't have to laminate them. I keep my puzzles sets in manila envelopes with the grouping information labeled on the outside.
Sometimes you may not have enough puzzle pieces or too many. I just adjust as needed. I make sure that I have enough puzzle pieces for everyone, but pull out any of the extra's. The student who gets the one lonely piece gets to choose whichever group they would like to join. It's like getting the golden ticket! Sometimes I take out just one or two pieces and let the class know that some groups will be one piece short. It just depends on how many kiddos you have and how many students you need to be in a group.
2. Popsicle sticks (or, as my students like to call them, "The Sticks of Doom.")
I write the name of each of my students on a different large popsicle stick. When making groups this way, I pull the sticks out of their container in the amount I want in each group. This is a quick way to make groups!
3. The Sticks of Doom take 2
Another way to use popsicle sticks to make groups is to paint the end of each popsicle stick a color. For example, paint 4 sticks green, 4 yellow, 4 blue, etc. Students pull sticks and group themselves by the color they pull. If you have an odd number or an extra student, you can create a "golden stick". The student who pulls the golden stick gets to choose which group they would like to join.
4. Blind Grab
In a paper back or other opaque container, place colored tiles or pattern blocks. Students blindly pull out colored tiles and arrange themselves in groups based on the color of the tile or the shape they pull.
Other Options: You can also do this with candy. Go to the bulk section of your grocery store and buy some of the mixed candy. Put candy in the bag in the amount you will need for grouping. For example, if you need groups of 5, put in 5 peppermints, 5 Jolly Ranchers, and 5 caramels. Kids love this way of grouping!
5. By Appointment Only!
You've probably heard of appointment clocks or clock buddies. In my class we just call it "Appointments". Here is how it works:
Each student gets a "By Appointment Only!" bookmark. Students walk around the classroom and make appointments with each other for the times listed on the card. For example, if Jane and Steve want to make an appointment, they find a time that they are both open and then Jane writes Steve's name on her sheet and Steve write's Jane's name on his sheet and that time.
I usually give about 15 minutes or so for students to make their appointments. When most students are finished, I take over and help match up students based on what appointment they still have open. Sometimes I have to end up making groups of 3 which still works. I only do this at the end though.
When all of the appointments have been made, I gather the bookmarks and laminate them. I hand them back to my students and they become responsible of them. When I need students to work in pairs or share their work with a partner, I roll one or two dice and call out the number rolled. Students meet with the person who is scheduled at that time on their appointment list.
You can grab a FREE DOWNLOAD of these bookmarks as a "Thank You!" for visiting Literacy Loves Company!
Keeping students engaged and helping them to work with a variety of people is one of the many tasks we do as teachers. I hope that one or more of these grouping ideas helps make that task a little more interesting for both you and your students.
I know that there are MANY, MANY more great grouping ideas out there! I'd love it if you would share yours in the comments below.
Thanks again for visiting!
NEW PRODUCT ALERT!
Are you a 3rd - 4th grade teacher? Check out the newest resource in my TpT store:
This product includes 5 different MULTI-STEP word problems connecting to special days and events in the month of November! Each word problem story has 4 problems for easy differentiation . The provided answer sheets guide students to focus on parts of each problem and break them down into small tasks throughout the week. In just 5-10 minutes each day, students work on CCSS math standards while improving their mathematical practices.


