Sunday, February 10, 2019

Art for Kids: Snowy Trees

Classroom art for kids. Snowy Trees - Beautiful winter art projects for the elementary classroom brought to you by Literacy Loves Company.

Happy Sunday Afternoon!  I'm sitting here in my living room looking out at the beautiful February sunshine.  The funny thing is, this weekend we were forecasted to have the snowstorm to end all snowstorms...  grocery stores were rampaged.  Gas station lines were miles long.  Teachers and students alike were prepping for snow days this week.  It's now Sunday and I am looking out at bare ground and glorious sunshine.  I'm not sure if I should be disappointed or relieved.

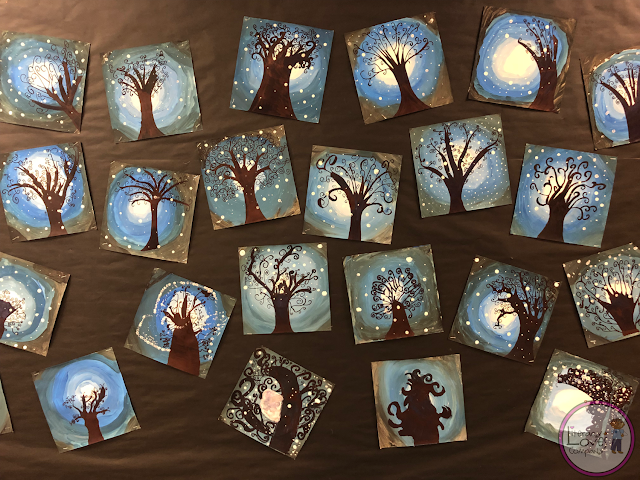
As a type of precursor to this "snowpocolypse", my students completed their snowy tree art project this week and we finally got them on display.  They turned out beautifully...  each one is unique and the whole display is magical!
Classroom art for kids. Snowy Trees - Beautiful winter art projects for the elementary classroom brought to you by Literacy Loves Company.

I often get my inspiration for classroom art from the internet.  While searching for a winter project, I came upon a photo of a project similar to the one you see above.  As I prepped for writing this post, I tried to search it out so that I could give the original poster credit and was unable to find it.

One of the things I love to do is find an original piece of art and try to figure out a way to make it accessible to my own students.  This means determining which medium to use with our limited resources and the step-by-step order for the project since we have limited time.  This project takes at least two sessions with drying time in between.

For this project we used these materials:
white card stock cut into 8 1/2 by 8 1/2 squares
white, blue, and black tempera or acrylic paint
sharpie markers
larger black permanent markers

Prep:
I cut the paper into the squares.
I put plates and paint brushes on each group table.  On the plates I put a dollop of white, blue, and black paint.

Step One:
Students paint the background by painting a white circular shape in the middle of their paper.  As students work out from the middle of the page, they mix blue into the edge of their white paint creating a light blue.  As they work out toward the edge of the paper, they continue to add blue until they are using pure blue.  At that point they start to add black to their blue to darken it and continue to work out until they work their way off of the page.  Many of my students went back in with white, after cleaning their brush,  to smoothed out and widen the middle circle.  We stopped at this point, cleaned up, and let the paintings dry.

Step Two:
Once the painting dry (later that day or days later) hand out the paintings, Sharpie markers, and bold tip permanent markers.  I demonstrated for my students, under the document camera, how to draw the curvy branches and fill in the trunk.

When I did this for my students, I modeled directly on the painted background.  The background was a bit more rough so students had to work more carefully.
Classroom art for kids. Snowy Trees - Beautiful winter art projects for the elementary classroom brought to you by Literacy Loves Company.

Classroom art for kids. Snowy Trees - Beautiful winter art projects for the elementary classroom brought to you by Literacy Loves Company.
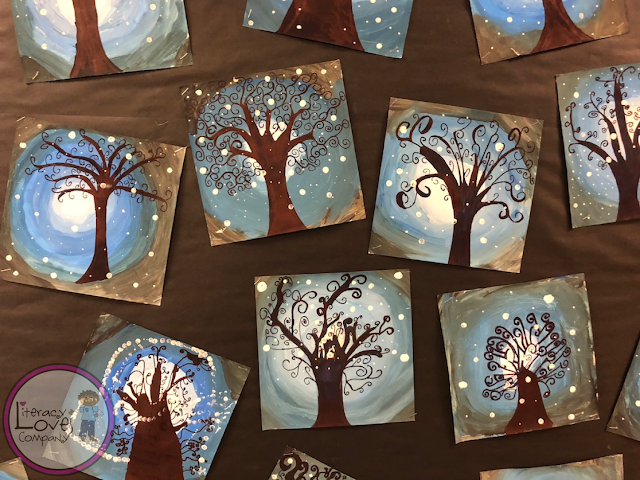
Some students positioned their trees in the center of the page and others off to the side.  Both are beautiful!

Step Three:
The final step is to put "snowflakes" on the page.  provide one dollop of white paint for each group of about 4 students.  I happen to have corndog sticks that we used to make the tiny dots (pointed end) and the large dots (blunt end).  You could also use small dowels, toothpicks, the handle end of paintbrushes, etc.  The goal is to make sure the dots are random around the page.
Classroom art for kids. Snowy Trees - Beautiful winter art projects for the elementary classroom brought to you by Literacy Loves Company.

Classroom art for kids. Snowy Trees - Beautiful winter art projects for the elementary classroom brought to you by Literacy Loves Company.
The results were magical!  Every tree turned out just as unique as the artist who painted it.
Classroom art for kids. Snowy Trees - Beautiful winter art projects for the elementary classroom brought to you by Literacy Loves Company.

Classroom art for kids. Snowy Trees - Beautiful winter art projects for the elementary classroom brought to you by Literacy Loves Company.
I hope that this post has inspired you to create some magical winter trees with your students.  If you do, please share your pictures on Facebook and/or Instagram and tag LiteracyLovesCompany.  I'd love to see your beautiful pieces of art.

Thank you for visiting!

signature-fonts


Sunday, February 3, 2019

How to W.I.N. in the Classroom: Managing Materials

Organizing materials for your W.I.N. Block math stations can be a challenge.  Get some  management ideas from Literacy Loves company.

One of the keys to success for incorporating a W.I.N. block into your classroom routine is organization.  While implementing W.I.N. in my own classroom I have found that there are three main organizational areas:  student materials, station materials, and teacher materials.

STUDENT MATERIALS
Each of my students has a red pocket folder that follows them from station to station.  Of course, you don't have to have RED folders, that is just the color I had on hand.  I would suggest, however, that all of your folders are the same color.  This makes it easier to locate them and rotate them to the different groups.  On the front of each folder, I have written W.I.N. block and the student's name.  Students keep their W.I.N. Weekly Report and other station materials inside.

I also have a file folder for each student.  I would suggest using a different color than the pocket folders.  I happen to have had red file folders also, and because I used red for both it has been a little more challenging to sort out the folders.  This folder stays with the "Targeted Practice" station.  At this station, students each have a worksheet or task that is differentiated for them.  When planning for my W.I.N. block, I place each student's sheet in that folder.  When they get to the Targeted Practice station during our 6 day rotation, their sheet is inside that folder and waiting for them.  If a student doesn't finish the worksheet, it stays in their file folder.  When it is finished, they turn it in to a "Turn In" manila envelope specifically for that worksheet.  I collect the manila envelope at the end of the 6 day rotation and check through the work to see who finished and to check accuracy on the work.
Organizing materials for your W.I.N. Block math stations can be a challenge.  Get some  management ideas from Literacy Loves company.

I include "Turn in" envelopes at any station that has written work that should be collected.  This isn't anything fancy, I usually just tape an index card with the name of the worksheet or task on the outside so that I can reuse the envelope the next round of stations.

In the pictures, you might notice the station signs.  I have found that they aren't really necessary since the materials bin acts as the station sign.

STATION MATERIALS
I have found that in order to successfully stay on top of my W.I.N. stations, it is important that each station has a bin, basket, or tub that is clearly labeled with the station name and includes ALL of the materials students would need to complete the tasks.  Because of a limited amount of time for our W.I.N. block, I want my students to be able to sit down at their station and have everything they need right there for them to get started.  It doesn't really matter what type of container you use, but if you are able to, it would be helpful if they are all the same style/color so that students easily know that they are for W.I.N. block.
Organizing materials for your W.I.N. Block math stations can be a challenge.  Get some  management ideas from Literacy Loves company.

In each station tub, I include the directions for the task, any worksheets that students may need, rulers, markers, etc.  For my game station, if the game has a sheet that needs to be written on, I put four copies of the game in sheet protectors and provide whiteboard markers and erasers.  This saves on copies.

TEACHER MATERIALS
One thing you may not know about me, or maybe you do if you have read some of my other blog posts, is that I can be a jump-in-with-two-feet kind of person.  I usually dive right in and figure out the logistics later.  The logistics of organizing my teacher materials was the area I put off the longest. When I first started, I kept everything in a pocket folder.  This worked okay for awhile, but it became difficult for me to find my answer keys, last round's student grouping information, etc.  While writing this block series, I've been working on getting more organized in this area.

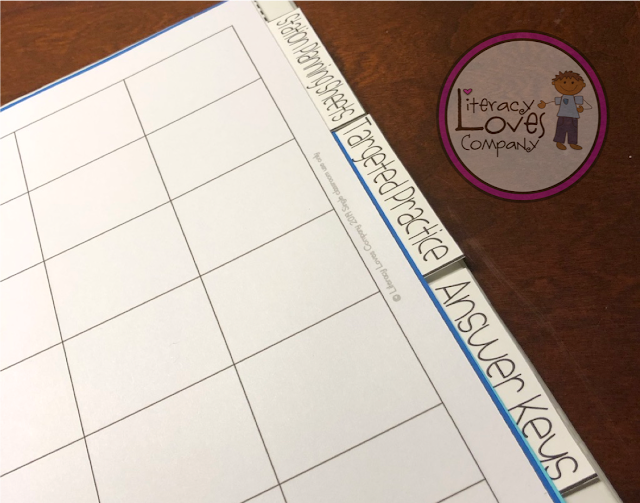
Now I am keeping myself organized by using a binder.  Not surprising, I know.  In my binder, I have sections for my W.I.N. Block Planning Sheets (Free download available on linked blog post.), answer keys, and targeted skills pages.

Organizing materials for your W.I.N. Block math stations can be a challenge.  Get some  management ideas from Literacy Loves company.

Using the binder, I can keep track of future skills I want my students to work on, data for future groupings, and the answer keys for the worksheets and tasks I am having my groups work on.  I'm sure this is going to work out much better than my previous pocket folder did!
Organizing materials for your W.I.N. Block math stations can be a challenge.  Get some  management ideas from Literacy Loves company.

Organizing materials for your W.I.N. Block math stations can be a challenge.  Get some  management ideas from Literacy Loves company.

As a gift for visiting Literacy Loves Company and joining me on this W.I.N. blog post journey, I've created a binder cover, spines, and tabs and am sharing them with you.
Organizing materials for your W.I.N. Block math stations can be a challenge.  Get some  management ideas from Literacy Loves company.
Included in the download is the color version you see here and also a black and white version.  


I hope you will continue to visit over the next couple of weeks as I finish off the series with information on how I keep my students accountable for their work during W.I.N. time.  My final post on this subject will be some advice on how to bring it all together into a successful routine for both you and your students!


•   What is W.I.N.?  - free download of "What is W.I.N. Time?" and "Expectations" posters.
•   Organizing Student Groups - Free download of Group Organization tool
•   Station Ideas - free download of editable station signs and group headers
•   Managing Materials - free download of binder cover and spine
•   Keeping Kids Accountable - free download of student recording sheet
•   Launching a W.I.N. Block - Mystery download!

If you have any questions or suggestions for managing materials for math stations or a W.I.N. block, please comment below!  I would love to hear from you.


signature-fonts